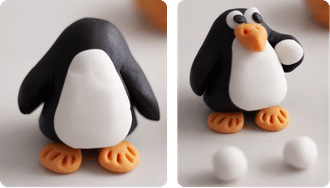
Before you start…
Ensure hands are dry at all times or the fondant will stick.
Warm the fondant well by rolling it for a minute in your hands to make it pliable. This helps it stick well to other pieces, and helps it be easily put into shape.
If you have have trouble sticking pieces together, use a tiny amount of water & a cotton bud on the fondant.
Alternatively you could use cocktail sticks through the fondant for stability, but water is first choice.
BEWARE: dark fondant colours will stick to your hands and stain light colours. Wipe any colour off your hands with a wet wipe and dry hand with a napkin before using the white/light colours. The same applies to utensils.
Most items can be moulded with your hands. Drinking straws can be used as mini rolling pins if necessary.
Keep testing and adjusting the shape of your pieces to ensure that they can stand up on their own.
Arms and face details are optional - they are more complex and take more time.
When complete, put your fondant cake topper in the boxes provided. Do not put them in the fridge - condensation will occur. Store in a cool, dry place. They will harden slightly over time.
To put on a cake later, apply a small amount of water to the bottom, and carefully place on the cake before serving.
You will need: Fondant in various colours, cocktail stick, straw, knife, eyes.
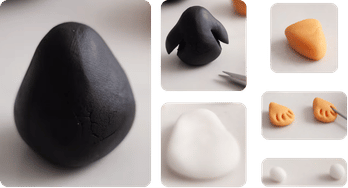
Make an egg shape at the height you want your penguin to be, using black fondant. Wipe and dry hands after handling black fondant. Hand-mould a flat white shape for the front, plus any snowballs. Put this on the body before doing face.
Flippers: Either hand-mould separate flippers to press on, or cut them from the main body by marking a ‘V’ shape with knife and use knife to pull flippers up. Smooth sides with fingers. You could use a cocktail stick for indents on the flippers and beak. Eyes: Can be hand-made or use the premade eyes provided.